28 July, 2011

Stress Relief


This has been a very demanding week of deadlines, parenting and very early mornings. Mama needs a break.

Even though I've got a million things on the go and my priority should be finishing finishing at least a half dozen of them I decided that the best stress relief was to start a new project. Makes perfect sense.

Amanda Jean's 36 patch quilt along perfectly fits the bill for me. These are easy blocks for me, almost mindless. I had a stack of fabrics sitting there leftover from another project, and a recent discovery that these colours are those exact ones for a needed wedding gift. And done.

Only 32 more blocks and two more big deadlines to go.

26 July, 2011

Fuddy is Not Duddy Challenge


It all started with a random tweet. I can't remember who said it first, but those tweet chats move fast! Before we could type burgundy, the gauntlet was thrown. So thanks to Talkin' Tuesday chats (hosted by Cara) and with the enthusiasm of Barb, Thomas, Susanne, Lesly, and a few more, we've got ourselves a challenge.

Introducing the Fuddy is Not Duddy Challenge.

Take your best burgundy, green, and brown fabrics, add in one more neutral or colour (one only).
Make a doll quilt to prove that these fabrics and colours aren't as old-fashioned as you or anyone else might think.
Share it with the world by October 10, 2011.

A Flickr group will be up soon. And I'll post closer to the end date with a Mr. Linky so everyone can share their finished pieces. It's all in good fun, but a prize or two is highly likely.

Are you up for it? Can you see beyond the bright, saturated colours many of us are instinctively drawn to? Can you combine the traditional and the modern?

Lemon Quinoa Coleslaw for Summer

Summer is a fine time for picnics and nearly no cook meals. We're tired from the heat, we're lazy from the heat, and we're hot from the heat. Yes, you could eat ice cream or even strawberry shortcake for dinner, but sometimes we do need a little bit more.

This coleslaw fits the bill. It's fast and easy to make, makes use of only a few ingredients, is packed with protein, and is completely dinner outside appropriate.

The quinoa adds protein and added crunch. The lemon vinaigrette is a change from the typical creamy or overly astringent dressings usually found on a slaw. The choice of cabbage takes advantage of what you get from your CSA or the market. And unlike traditional coleslaw, which benefits from a rest in the fridge before serving, this slaw can be eaten immediately.

You still need to eat in the summer, make it easy on yourself.

Lemon Quinoa Coleslaw
(serves 6-8 as a sidedish or 4 as a main course)

Vinaigrette
3 cloves garlic
2 lemons, juiced
1 tbsp honey
2 tbsp olive oil
1 tbsp dried oregano or 3 tbsp fresh, finely chopped

Slaw
1/2 cup red or regular quinoa
1 medium head Napa/Savoy Cabbage or Suey Choy (approximately 8 cups when thinly sliced)
1 can drained and rinsed chickpeas (optional)

Garnish
1/2 cup toasted walnuts

Finely chop the garlic cloves. In the bottom of a large bowl combine the garlic with the rest of the vinaigrette ingredients. Set aside while you prepare the rest of the slaw.

In a small pot combine quinoa with 1 cup water. Cook over medium heat until all the water is absorbed (8-10 minutes). Let cool while you prepare the cabbage.

Cut the cabbage in half from the root end. Remove the tough center portion. Using a sharp knife or mandolin slice the cabbage crosswise as thinly as possible. Don't worry is you have a little bit more or less than the predicted 8 cups.

Toss the quinoa, cabbage, and chickpeas (if using) in the bowl with the vinaigrette. Season with salt and pepper. Transfer to a serving dish and garnish with walnuts.

21 July, 2011

Missing


Have you seen these quilts?

They've gone missing in the pack-up from Market in Salt Lake City this past spring. They are all projects, cover quilts even, from books by C&T. The publishing house is looking to get them back so they artists can have them again.

Note: there is a reward for their return. A not insignificant one.

20 July, 2011

Seven Tips for Dining Out as a Family

The first meal out for our family after having a baby was sushi. Our newborn slept in her car seat and I gorged on the fish that had been banned from my diet during pregnancy. It was bliss for everyone. Our last venture to that same sushi bar (last month) was a bit more raucous, with the girls not so quiet now. But they sat at the bar, ordered their favourite sashimi, and flirted with the host who gave them candy.

We can't imagine our lives without the opportunity to take the kids out for dinner. If we didn't take them we might not go ourselves with limited babysitting in town! But if you want to take your kids to a restaurant, whether it involves a giant golden M or serves fois gras, there are some basic guidelines. These are guidelines for parents, not rules for kids.

1. Start at Home
If you want your kid to sit at the table, eat, and not run around and scream at a restaurant table then you need to expect that behaviour at home as well. I know many a parent who struggles to keep their kids at the table, regardless of where they are sitting. While I can't provide any tips for getting them to stay in their seat - other than expecting the behaviour and enforcing it - if your kid can't sit at the table for 20 minutes then a sit down restaurant isn't going to be a successful venture for you.

2. Revise Your Dinner Expectations
When you take your kids out to dinner with you then your experience will not be that same as dinner out with your partner. There is no lingering over dessert, conversations are not usually about politics or money, and you will likely eat pretty fast. Dinner out with the family isn't romantic, but it can be fun. Keep your expectations in check, as well as your timing.


3. It's all in the Timing
Knowing when your kids need to eat and when they'll crash is important if you choose to eat out. Don't arrive at the restaurant at 6 if they are used to dinner on the table at that time. Be prepared to order an appetizer or the entire meal when they come by to take a drink order. And ask for the check right after your meal is served in case you need to make a speedy exit.

4. Choose Wisely
There is no need to limit your family meals out to fast food or even chain restaurants. Steakhouses, greasy spoons, and yes, fine dining are all acceptable. Do not take your kids to the best place in town if all they've ever eat are chicken fingers, you need to work up to that. Consider going to a nicer restaurant on a weekday, not on typical date nights on the weekend. Preview menus on-line or with a drive by to ensure there is something your kids will likely enjoy. Try brunch instead of dinner, it's faster, more likely to have preferred options, and is a more casual environment - even in a fancier restaurant.

5. The Art of Conversation
I'm not a fan of bringing toys and such to the restaurant, but I can see the benefit for other families. A run of the mill restaurant will sometimes provide the menu that can be coloured, or you could bring your own colouring book. Books, a small doll, a random car, or even an electronic device might also be effective in occupying your kids while you wait for food. It should go away when the food arrives though. We take the time in a restaurant to have a conversation - as effective as that is with a 3 and 5 year old. I also don't want to set the precedent that toys are commonplace when you go out for dinner. Each family will have to decide what is appropriate.


6. Lose the Kids Menu
Even the fanciest of restaurants sometimes have a kids menu. Ignore it. It may be fine dining, but they are often dumbing down the food in addition to smaller portion sizes. Instead, look to the appetizer or soup/salad portion of the menu. Alternatively, you can order one main course and split it among two or three children. Do not relegate your kids to a diet of chicken fingers or grilled cheese sandwiches. Or at least, save those for the nights you stay home when you don't feel like cooking.

7. Be Prepared to Leave
Yup, be prepared to get up and walk out without dinner. If your kids are misbehaving, whining, or generally being bad or disruptive, be prepared to leave without eating. Aside from showing restauranteurs and other patrons that you have control over the situation, you are also showing your kids that certain behaviour is not tolerated. Whether you let them eat dinner at home after that is another matter. (I would not, but that's me.) If you want your restaurant experience to be successful and repeated, then you need to set the precedent.

On the recent debate on Q, with Jian Gomeshi, Emma Waverman, and Simon Majumdar, the host and guests talked about a ban on kids in restaurants. While I squarely believe in the comments made by Waverman, it was this quote from Majumdar that sums it up. Restaurants want to ban kids, primarily because of crying and bad behaviour, and that "Boils down to wretched parenting."

If you want to take your kids out of the house - and we all need to at times - then you need to step up to the plate, plan ahead, and be clear on your behavioural expectations with them. A restaurant isn't always a break at dinnertime, don't treat it that way unless the kids are at home with the babysitter. Dinner out with the family is an opportunity for exploration, conversation, and treats.

19 July, 2011

High Romance

My husband and I really know how to turn up the romance. As one friend said, we know how to have a CRAZY time.

This is us. It's after the girls have gone to sleep. We cracked a beer, turned on that day's Tour de France coverage, and basted the triangle quilt.

In his defence (and mine), I made him help me. The quilt is for the girls so I thought he should, literally, have a hand in it. Besides, at 90'' by 90'' it was taking over the living room as it was basted, he might as well have helped.

15 July, 2011

Here and There


Been looking for me lately?

Aside from my love for Twitter - oh how it fuels inanity - I've been out and about. Here are a couple of places where you can find recipes, cooking school features, and articles from me.

Profiling part of the goat industry here in Alberta.
* Coincidentally, you could also participate in Goaterie as a great way to get your goat on.

Take advantage of that back alley rhubarb in these refreshing cocktails and summer drinks. I am truly addicted and still scoping out unharvested rhubarb plants in the neighbourhood.

Both of these articles were written for the Taste Alberta series. I've got to admit, although I've been published in magazines, it was kind of special to see a byline in the newspaper I grew up reading, The Edmonton Journal. It was also neat to get the notices that the articles were picked up across the country.

You can also read weekly posts from me at What's Up Families. I especially like these cooking school posts I've been doing. Once a month I've been sharing info and cooking tips on a specific ingredient. In time for summer there is a post all about ice cream and one on taking advantage of summer greens.

Finally, I've also been writing for Delish Mag. This great lifestyle, on-line magazine gives me the chance to write about some fun topics. In this issue alone I was able to interview a great fabric designer and artist as well as talk about visiting farms! In the last issue I write about turning into my Baba and interviewed another designer.

Other places you will find me? Trying to tame both my overgrown tomato plants and my overblown children.

14 July, 2011

Making It Work

When it came time to put together the Triangle Quilt I had some work to do. When I started out in the bee I wasn't overly particular about finished block size, just asking for a variation of 12.5'' to 18.5''. And in sending out a Canadian fat quarter of the background fabric it isn't always easy to get a 18.5'' block. It would have been impossible with a US fat quarter. That meant that I got blocks 12.5'' square, 18.5'' square, and 12.5'' by 18.5''.

What to do?

My initial plan was to mix it all up and assemble the top like a puzzle, adding extra blocks or chunks as needed. It is a part of the process I actually relish, the puzzle challenge.

When I decided to turn these blocks into a bed quilt, however, I needed something a bit more straightforward. I needed blocks, all the same size. If this quilt was going to get done it needed an easier puzzle.

That meant that I had to turn the smaller blocks into 18.5'' square blocks. A run through my stash revealed that I was no longer in possession of some of the fabrics I'd used. It confused me, because I could have sworn I kept aside some extra fat quarters for this precise purpose. Oh well, nothing a little shopping (at home and at the store) couldn't solve.

Of course I could not find the fabrics I'd used, save for one. No problem. The backgrounds were already a mix of yellows, adding a few more wasn't going to be the end of the world. I truly embrace the improvisational spirit. Tim Gunn would be proud.

It seems fairly standard to add sashing to bee blocks. For one, this increases the size of your quilt without having to make more blocks. Secondly, it is a good way to even out the size of what might be slightly different sized blocks. Even with a good pressing, one person's 12.5'' square can be slightly different than another person's. Adding to each block is an alternative to adding sashing.

Besides, you know how I feel about sashing.

This is what I did. (Using 2 blocks as an example.)


So I added on to about 8 blocks. I also made another 12 blocks from my yellows and leftover geese fabric. I laid out the top.

Then I found the yellow fabric I'd set aside.

12 July, 2011

Calm Complexity


Option 5 won out. Sort of.

After an evening of doodling/sketching and staring at the layouts, Hubby and decided on a wilder pattern that was only indicated by Option 5. So I set up a temporary design wall by taping batting to a beam, put the sprinkler on (and the TV later) for the girls and I spent the afternoon working out the puzzle. After the girls were in bed I picked up the mess made when my youngest (aka Evil Genius) purposely walked through the hanging batting and Hubby helped me finish the puzzle.

(don't ask me why my winter slipper is in the midst of that when this was taken on the hottest day of the year so far.)

It was a fantastic, contemplative exercise. I definitely picked the most complex of the options. Not because I like to make my life difficult, but simply because that's what spoke to me. I could happily have made any one of the quilts, and likely will at some point. Thank-you for all of your opinions.

And maybe, just maybe, I would love to keep up the design wall... It looks good from the front and back.


07 July, 2011

Quilts Recover Update


The sun is shining! I can ride my bike again! And I may have actually sewn too much!

Okay, no exclamation point on that last one. My foot is bothering me and my physio thinks working the foot pedal may be to blame. Yikes! Can't stop me though, it's manageable and I'm on a roll.

Besides, I've also got Quilts Recover to keep me busy. The quilts are starting to come in now that the postal lock-out is over. Good timing too as the Duke and Duchess of Cambridge returned the spotlight to the rebuilding of Slave Lake this week.

If you are planning on donating to Quilts Recover there is still time to do so. We are accepting finished, unused quilts in a functional size (baby to full/queen) until the beginning of August. All quilts will be labelled and delivered to families rebuilding in the wake of devastating wildfires in the town of Slave Lake, Alberta.

Many overseas readers have also expressed a desire to donate quilt tops, as the postage for quilts is quite a bit. I can share now that I've lined up a long armer and a few volunteers to help us finish these quilts. I'm still looking for batting and backing donations. If a finished quilt isn't something you can do, maybe you can consider donating some supplies. Or, if you are local, maybe some time to help get the quilts bound and labelled. I will be announcing a sew day for late July/early August to finish all that.

Again, thank-you for all your support for Quilts Recover.

05 July, 2011

Hula Hoops and Strawberry Shortcake


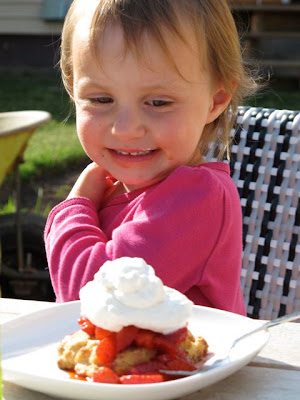
We ate strawberry shortcake for dinner the other night. Not for dessert, but for dinner. Just strawberry shortcake for dinner. And it was awesome.

Okay, I may have been more excited about it than the girls (Hubby was away). They ate their strawberries, picked at the shortcake and licked some of the cream. The Monster thought the macerated strawberries were a fun treat - I can suck out their juices like Jello, Mama!

I may have, ahem, finished theirs as well as mine.

And you know what? I don't feel guilty about this at all. It was a celebration of all that is awesome about summer. Days that involved nothing more than swinging, water fights, and mastering the Hula Hoop for the first time. Days that have your three year old running around the block naked because her clothes got wet and it's too much work to go inside and get new clothes. Days that end with dessert for dinner eaten outside with the sun in your eyes.


Strawberry Shortcake includes fruits, grains, and dairy. If that combo is more than okay for breakfast it is certainly fine for dinner. Of course, ice cream is also fine for dinner. Along with popcorn, pancakes, and cottage cheese with fruit salad. Dinner does not have to involve a protein, a vegetable, and a starch to be dinner.

Dinner has to be the gathering around the table; the moment when we stop, just for a second, to be together as a family. It is the time when we listen to a 5 year stammer through her excitement, the time we discuss pirates, a balanced diet, and why we can't fly to Australia for a day. It's the moment we refuel so the rest of the summer night can be spent with the Hula Hoop.

If I want to serve only dessert for dinner on a nearly perfect summer day, so be it. If you want to, then go for it. And if anyone complains or judges, then send them to me. I'll set them straight with shortcake.


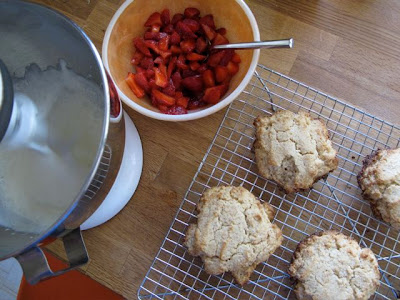
This strawberry shortcake was probably the best I've ever made. I've made the shortcake a few times now, the recipe comes from Baking, by Dorie Greenspan. I've adjusted it to a more reasonable size for our family. It is about the flakiest, most balanced little biscuit cake in the world. Crumbly and fine, but with enough structure to hold up to juicy strawberries and ever so lightly sweetened cream.

Strawberry Shortcake for Dinner
Makes 6 shortcakes

1 cup flour
1/3 cup whole grain flour*
2 tsp baking powder
1/2 tsp salt
2 Tbsp sugar
1 Tonka bean, grated (optional)
1/2 cup (1 stick) cold butter
1/2 cups cream

Preheat the oven to 425 degrees F. Line a baking sheet with parchment or a Silicon mat.

Whisk the dry ingredients together in a large bowl. Cut the butter into 1/2'' cubes. Using your hands, two knives, or a pastry cutter smash the butter together with the dry ingredients. I use my hands and squish it through my fingers. My 3 year old helps. It takes only a minute or two and the dough starts to look like a mix of flakes, crumbs, and tiny knobs of crumbly butter.

Remove your hands from the bowl, grab a fork, and pour in the cream. Stir together. If necessary, use your hands again to get it all to come together. The dough will be sticky.

Spoon into 6 piles on your prepared sheet. Shape a little and press down gently so they are no more than 1'' high. Bake for 12-15 minutes, until golden. Let cool for a couple of minutes on pan, then cool for a few more on wire rack.

To make the shortcakes you also need strawberries. Any other summer fruit would also work. Go with what's fresh and in season for you.

2 cups clean and sliced strawberries
1 Tbsp sugar

Combine the berries and sugar, let sit while the shortcakes and baking and cooling.

1 cup whipping cream
1 Tbsp powdered sugar
1 tsp vanilla

Whip the cream until peaks are just starting to form. Add the sugar and vanilla, whip until lightly firm.

To serve, top a cooled shortcake with a generous scoop of berries and top with a large dollop of whipped cream.

*I used my favourite, Gold Forest Grains, but you can simply use all-purpose flour for the entire amount.


Decisions Decisions

The versatility of the half square triangle is liberating. It can also be paralyzing when you actually examine the options for laying out a quilt from nothing but HSTs. If you are a person who has a hard time making decisions it is best not to play with layouts. Go with your gut the first time out.

If, however, you are like me and enjoy playing with layouts, then grab a beer or a tea and contemplate away.

Option 1

Option 2

Option 3

Option 4

Option 5

Option 6

Option 7

Option 8

Option 9


This is just a small sample of blocks, the finished quilt will likely be 16 or 17 blocks across and down.

Now I'm not generally someone who has a tough time with decisions. I learned a long time ago that too much is wasted contemplating "what ifs". That being said, I've got no clue where I want to go with this one. I'm bringing you and Hubby into the fold. You, my readers, because you always point out interesting things I may not see. And Hubby, because this is now going to be a wedding present for friends and if he wants his name on the label then he has to help.

So... opinions?