30 November, 2009

Quilt Along Week 5 - Assembly


So you have all your blocks cut out and sitting in a neat, untouched pile, right? Okay, I hope you've at least had a chance to cut them out so far. Today we are going to assemble them in to a finished quilt top.

The layout for this top is quite easy. All you have to do is remember to alternate horizontal blocks with vertical blocks. That is, your stripes go side to side on one block and up and down on the next. If you have a design wall, great. If, like me, you are in a constrained space you use whatever is handy - a fence, a bed, or the living room floor during what you hope is a very long nap.

I just pick a corner or the center of the quilt and start throwing down blocks. To be honest, I don't think about it too much at first except to ensure that I don't place two blocks side by side. Rather, I just want to get a feel for the layout. As I go I will start to notice whether I've got too many of one type of fabric together. Or might try to put some fabrics together to create a mini rail (of the rail fence) in the quilt.


Overall, I'm looking for balance of a couple of elements when laying out these tops:
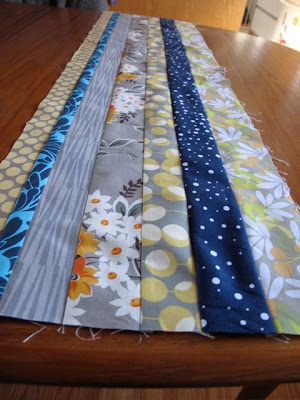
  • My accent pieces aren't heavily weighted in one area over another - disperse the thick and the thin strips or the colours if you used more than one accent.
  • Variation in the angles of the strips - some should go right, some left.
  • Disperse the background fabrics as much as possible.

Looking both close-up and stepped back allow for you to see your quilt in the big picture. Another trick is to take a photo with your digital camera. This helps you see the layout at a distance. You can also go to the hardware store and buy a door peephole. Looking through this makes everything appear at a distance. I love my peephole (when I can find it). For a reminder of the finished layout check out the picture in the sidebar or the finished Gratitude quilt.

Once you are happy with your layout I like to stack my blocks in columns. Start at the top left corner of your layout. Take the corner block in your hand and place it directly on top of the block directly below it in layout. Do not rotate it or any of the blocks at this point. Continue to stack each column.  I also label the top left corner of each stack with a pin and a sheet of paper. Just to minimize confusion.

To piece the top I sew column 1 to column 2, in one continuous strip. At the end of each block I simply sew a few stitches and then I start on the next set of blocks.  

I sew the entire column together then press.  To press I sew one row to the right, the next to the left.  On this particular quilt I press towards the vertical strip.  This will make the top lie quilt smoothly.

The top goes together quickly by sewing one column after another. I keep the next stack of blocks to the right of my sewing machine and grab a block as I go. Do not cut apart the completed rows. Once you've sewn all the columns together you are left with pieced rows.  Your columns, strip pieced, create finished rows. See the picture below if that doesn't make sense.

All that remains is to sew your rows together.  This is the one point where I pin. Because I pressed towards the vertical strip on each block and I alternated vertical and horizontal blocks in the layout my seams will lay flat when I match them up. I pin two rows rights sides together and sew. I repeat this until all the rows are together and then press all the seams in one direction.

Et, voila!  A finished top.

Here is where I apologize for not having a picture of the completed top in the yellow/grey/navy. It is finished, but I haven't been able to take a picture because a) Hubby can't lift his arm for the picture b) even if I was home during the day to take a picture when it is daylight there is now snow on the ground. Soon, I promise.

27 November, 2009

When I Turn My Back

There are two school of thought on welcoming your kids into your quilting habit.  On one hand you can have a sewing room with a closed door and they are not allowed to touch your fabric. On the other hand, you can let them play with the fabric and make a giant mess.  I will fully admit that some days I wish I had a design wall and a door to close (and lock). But most days the girls are knee deep in scraps and helping me pick fabric.


This is what happens when I turn my back on a pile of fabric.


Where do you stand on kids getting involved with your quilting habit - the process, the fabric, the inspiration? I'm working on an article on creating and quilting as a family, so I'm curious as to your habits.

26 November, 2009

Who Moved My Cheese?

If you're ever looking for party ideas I've got a new suggestion for inspiration: the business section of the book store.  I'm serious.  We had a great party in the office today and I came up with the idea after reading this book.

There is no need to bore you with the details of the office, suffice it to say there's been more than a bit of upheaval lately.  We have a good group of people with some pretty strong convictions.  Perhaps more importantly, we all have a pretty wicked sense of humour.  Even the senior folks were entertained by the party idea. A little chat about finding our cheese when it comes to work, combined with an ongoing mouse problem in the building gave us the idea to have a cheese crawl in the office.

People set up a plate of cheese and accoutrements in their office.  Then, individually or in small groups, we wandered the halls visiting and tasting.  And yes, we hid the cheese of one boss so that he was forced to yell, "Hey, who moved my cheese?" Hmm, maybe it's an inside joke.

Quite surprisingly to me everyone totally got in to the idea.  We had a great variety of cheeses from an amazing triple creme brie to a heavenly honey goat. Winner of the most unique cheese was the gjetost, or Norwegian brown cheese.  It looks like fudge and does have a caramel taste to it.  We ate it on mini rye with cucumber.  I don't think it was very popular, but I really liked it.

My contribution was the Seckel pears with blue cheese, honeycomb, and hazelnuts. We were served something very similar on our trip to the Okanagan in September (The dinner is gloriously summarized here.)  The difference was that the pears we ate there were still warm from the sun and the blue was local Poplar Grove. I've taken to eating the pear, blue, honey combo as a frequent snack so I passed that on today. The consensus is that they would also make a fantastic holiday appetizer, or perhaps as an alternative to chicken wings this Sunday for the Grey Cup.

And, of course, there was just a teeny bit of wine. Served in our glorious reusable plastic cups.

24 November, 2009

Quilt Along Week 4 - Carving out Your Niche


Another video!  My apologies for the bad lighting and my apparently rosy cheeks. (A total aside - I love when The Monster says 'apparently', it is a totally overused word in our house.) It's week 4 of the Quilt Along.  How are you doing?

Start with your strips sets, well pressed and 1.5-2 inches wider than the desired finished size of your blocks. You can see below what I mean. I am aiming for a 9.5 inch unfinished block.

Take your ruler and start rotating it. Aim for an angle like below - just a little bit off center. One important thing to keep in mind is that you want to avoid teeny strips on the side. Ensure that you have at least .5 inch strip from the last seam to the edge of the cut.  Conveniently, the ruler is your cutting guide so you can watch this. 

Cut the right side and the top.  If you are left-handed it might be more comfortable to cut the left and top first.
Flip around your fabric strip.  Generally I do this by rotating my entire cutting mat instead of lifting the fabric. Line up the bottom left corner (bottom right if you're left handed) with the 9.5 inch by 9.5 inch (or your desired size) marking on your ruler.  This will create cutting lines on the edge of the ruler for your side and top to finish of the block. Cut.

And there you have a finished block.  It can be used in any direction when it comes to laying out your blocks.

Now you need to cut out the rest of the blocks from the single strip set. How many you get will depend on your desired block size.  You should get 6 if you want 6.5 inch blocks, 4 at 9.5, and 3 at 12.5. The process is the same as above, but you start above your last cut as opposed to the top of the strip set.  You can fiddle with the rotation of the ruler here and there.  All your blocks can be cut in the same direction or you can rotate the ruler in the opposite direction.  I tend to do two in one direction, and two in the opposite.

The next two photos are examples of one strip set cut.  One for the original Gratitude quilt and one for the current one.

Notice the varying angles.  This will give you even more opportunities for dramatic movement in the final top.

Next week will layout our quilt top and get it together. Remember, try not to play with your blocks too much once you've cut them.  The seams are not finished and you don't want anything the loosen. See you next week!

22 November, 2009

Does it count?

Back when I was full of energy and vigor and swiss chard I entered my Frico recipe in the Safeway Cheese Champions contest. To be honest, I saw the ad on Facebook and was bored.  Yup, I actually noticed the ad, that's how bored I was. 

So I entered and found out recently that I won something.  Sadly, it was not the grand prize.  That means no Mama/Daddy time in Lake Louise for free.  But I did get a grocery gift card and it will buy our dairy for a couple of weeks. No complaints there.

And, if you are in a Safeway in the coming weeks, probably only in Western Canada, pick up the Safeway Cheese Champions book.  You will find my recipe and more in there. Oh, and a teeny tiny picture of me and The Monster. 

21 November, 2009

Under My Belt

My first teaching experience is over.  My first experience teaching quilting, that is. It is now safe to say that I have a new dream career. Out of the window is my secret fantasy of being a DJ. Hmm, okay, that will still remain a not-so-secret fantasy and teaching will become my aspirational career.

For the past two Fridays I taught an Improv Piecing class to 4 lovely and interesting women. (Full disclosure: one of those women was my sister-in-law.) They were all experienced quilters, but they ran the gamut from exclusive pattern users to art quilter.  Most importantly, they were there eager to learn some new techniques.  And they all left happy, or so they told me.

I now know that one of the best parts about teaching is seeing what your students can do with the information/ inspiration you are able to share.  The 4 women showed up with 4 very different sets of fabrics.  One came with a delicious selection of her own hand-dyed fabric. There was a grouping of earth tone batiks that is making me want to rethink earth tones. My sister-in-law showed up with a good chunk of her staff, then augmented it heavily for the second class because she was in a purple kind of mood. 

The final student came with a grouping of fabric that all showcased a chicken theme.  I'll admit it, it wasn't my cup of tea, but I love the way her blocks turned out!  It goes to show that improv isn't just for the modern fabrics. She is planning on making a table runner with her blocks.

During the class we covered wonky log cabins, chopsticks, free piecing, maverick/liberated stars, and what I call building blocks. The above blocks with all the purple are, of course, my sister-in-law's. I fear that my brother may be cursing my name because we figure she really started 4 different projects!

The blocks at the top of the post and this wonky churn dash are all from the same student. Aren't they fantastic?  Sadly my camera and the lighting did not do justice to her gorgeous hand-dyes. She did a lot of work at home between classes because she was so inspired. So we started talking about what else you could improvise. 

I'm eager to teach again, having made notes and refining the approach a little bit. Unfortunately, this LQS isn't interested in hosting the class again.  That's okay, we thankfully have a lot of stores around!

16 November, 2009

Quilt Along 1 - Needles and Irons


Okay, now where we? Oh that's right, we were making a quilt together.

At this point you've hopefully picked your fabric and cut it in to strips. Finally, we can start sewing.  And really, how hard can it be to sew strips together?  It isn't hard, but there are some things we need to pay attention to as we sew.

Get Ready to Sew

Pick a neutral thread.  Usually, I piece with a grey thread if I am using colours or medium and dark toned fabric. 

Separate your strips with the background pieces in one pile and your accent pieces in another.

Take one strip each of all your background pieces and set aside. 

Turn on your iron and get it hot.

Start Sewing

The first step is to sew all your strips (minus the ones set aside) together in pairs, right sides together. Match up the tops of the strips. Don't worry about the bottoms because all your strips will vary slightly in length.

Grab randomly! Sew together different background strips and sew background strips to accent strips. Do not sew accent strips to accent strips. Do not put an accent strip on the bottom of your pairs as you sew.

I find it easy to just sit and chain piece all these strips, one after the other. That means you sew one set together and without lifting your needle or cutting your threads you start sewing the next set of strips. And so on and so on.


Pressing

I am a firm believer in pressing and pressing well. Really, you can't make this design work well without pressing. But keep in mind that pressing is not ironing the life out of your fabric and stretching it out.

One of my quilt mentors taught me that you should be able to press with one hand.  We have a tendency to pull on fabric when we use two hands.  The hand we are supposedly using to hold the fabric often pulls on it without us even thinking about it. Try taking your iron and pressing while holding your other hand behind your back. It will feel awkward, but it is a good exercise to see if you have a tendency to pull.

You will also see that this method really only works when you press to one side, not when pressing your seams open.  I'm not a fan of pressing seams open, so this works for me.

To press your strip sets I recommend pressing the seam flat, right out of the sewing machine. Then nose your iron in between the fabrics, on the right side of the bottom strip. Slowly nudge the iron forward and to the side, pressing the top fabric to the side and down. When you've reached the end of the strip give it another full press.  Set aside and repeat for the other strips.

When you were sewing you matched up the top of your strips, right? So all your pressing should be to the strip on the right.  For the first set of strips (the pairs) this will mean you will always press towards the accent.  If you have darker accents then this is what you want.  If you have a darker background then you will press to the background pieces.

As you progress through sewing sets together keep trying to press to the right, unless you have a dark accent/background combo.  Then always press to the dark.  This conscientious pressing will ensure that your accent pieces will really pop.


Continue Sewing

Now that you have your first pairs of strip sets, you need to sew the pairs together.  Again, grab randomly.  And again, match up the tops of the sets.  Depending on how you sewed your first sets together some typical examples of the order of fabrics when you sew pairs together might be:
background - background - background - accent
background - accent - background - background
background - accent - background - accent

Press.


Depending on the final size you want your block, at this point you may be adding a single strip or another strip set as you progress. The final size of your strip set should be at least an inch and a half  to two inches larger than the desired block size. Keeping sewing strip sets together until you get the desired width.

The one thing to keep in mind when it comes to sewing your strip sets together is that you do not want an accent piece on the ends.  In other words, do not have your strip set start or finish with an accent piece.

This is the part of the process that might seem pretty boring at first, but as your strips sets come together you will get the first true glimpse of how your fabrics will look together.  Note whether fabrics are standing out in a good or bad way.  Your accents should really pop from the backgrounds.


And remember to refer to week 1 instructions to know how many strips sets you will need if you have a specific quilt size in mind.

We'll see you next week, to create our blocks and create the layout that makes the design pop!

12 November, 2009

Taste Adventure - Cape Gooseberry

After a very busy morning gluing brown circles to bigger brown circles, building floor puzzles of cats, and dancing to a jazzy version of Spiderman it was time to settle down for snacks. It was our day to volunteer at preschool. As the parent volunteer responsibilities include directing the craft, helping the teacher with all the regular tasks, and cleaning up at the end of the class. Our kid gets to be VIP that day, getting to go first for all activities and bringing something special for show and tell. Oh, and the parent gets the pleasure of bringing a snack.

Now, it should be painfully clear by now that I'm not the apple slice and snack pack kind of mom. I bake cookies and muffins when they ask me to. I don't bring juice for other people's kids. And when it is our turn to bring a snack I think it is a great idea to bring something likely foreign to the average Canadian three year old, like a cape gooseberry. I wonder what the other parents thought when they saw our snack reported on the calendar.

(A total aside, but don't you think having to record you snack is just another form of competitive parenting? Remind me to ask the teacher about that.)

A cape gooseberry isn't a common fruit. I always associate it with hotel fruit trays at meetings. Their distinctive papery coverings serve more as garnish to most of us. But peel that back and taste the sweetly sour fruit with the hint of sunshine. It's kind of like a natural version of sour gummy candy, minus the jelly texture. Personally, I love them. But I wasn't sure about the kids.

I baked cookies as a fall back position.

The cape gooseberries? They went over surprisingly well. In a class of eight kids one outright refused to even have the gooseberry in his bowl, stopping just short of a complete fit over the fact that it even touched his cookies. A couple more sniffed it and merely set it aside. Two more had to be cajoled... er, encouraged to try the fruit. And three happily tried them. One kept asking for more and more, leaving his cookies aside. Way to go kid!

My kid tried hers, declared it too sour, and returned to her cookies.

The kid that loved them?  His dad is a chef.

11 November, 2009

Slowly Emerging

Thank-you so much for all your kind words over the past week.  With everything that was going on it was wonderful to get your support. I am slowly coming out of the fog that was mere survival. And, in case you were wondering, the girls are now healthy and Hubby has started to feel some relief in his pain.  He's got a ways to go in healing, but he is no longer glued to the couch.  Hell, he even turned off the TV the other day he was finally so bored.

I did get some good quilting in on the weekend.  Some friends offered to take the girls for a playdate so between that and naptime I had nearly a full day of quilting.  It did wonders for my to-do list and my emotional health. First on the list was the samples for my class.  It starts on Friday and there are one or two spots left if you are in town. Once that was done I managed to get ahead on the Quilt Along project.  I will be coming back to that next week. I am quite excited by how it is coming together!

One thing I did want to announce at this point is that there will be a give-away for those participating in the quilt along.  At the end of the posts I will ask you to share with me the progress you've made  - whether it's just picking fabric or a completed quilt.  I will draw a name of participants to receive some inspiring treats. And no, there will be no hints as to the prize.

We'll see you back here next week.

08 November, 2009

Cottage Cheese

I have a desire to make my own cottage cheese one of these days, just like my Baba used to. That won't be happening until Smilosaurus learns to keep it on the high chair tray, at least, instead of decorating the dog. The worst part is that we usually rely on the dogs to clean up after she eats.  What am I supposed to do when this happens?

03 November, 2009

On Pause

This was supposed to the post for week three of the Quilt Along.  Supposed to be. I'm sorry to say that I need to put the quilt along and my blogging on pause for a week or two. I hate to do this to you and please know that I had no plans to do it when I started the quilt along. But we've had 3 trips to the ER this past week, for three different family members. The little one had croup, possibly caused by the flu.  I developed an infection that thankfully turned out to be minor but has rendered my right index finger quite tender. And on Sunday night Hubby broke his collarbone playing hockey.

So, I am full-time caregiver for three people now, on top of working, preparing for my first class teaching, and other commitments.  Something had to give.  For now that has to be quilting. And blogging.  I'm falling down drunk with exhaustion these days.  Not drunk AND exhausted. Although...

I'll be back in a week or two, I promise. Thanks for your support.

01 November, 2009

Costumes

Have I mentioned before that I am not that big a fan of Halloween?  It isn't about the sugar or the mayhem.  Personally, I've never enjoyed dressing up.  As a kid I went for the laziest costume ever more years.  My favourite was "Fat Jogger". Inevitably there would be snow for Halloween so I would wear my snow suit with a pair of my Dad's sweats on top. No make-up, no mask, no wig. My kind of Halloween.

This year, however, The Monster was ALL about Halloween.  She changed the words to 'Happy Birthday' to be 'Happy Spook Night All Trick or Treaters!' (Try it, it works.) And we had to count down to trick or treating.  Thankfully she had a good long nap and felt well enough.  Both girls have been sick this week so we were worried we wouldn't get out. I had their costumes together.  I can't decided if I'm awesome for putting them together or if my laziness towards Halloween shows?  No answer required.

Go out we did and my little Pink Unicorn and Leprechaun were in fine form tearing around the neighbourhood. And the costumes?  Well, we thought they looked damn cute.